One of my assignments were to create a new custom field type for
displaying a list of values and a checkbox for each column to include or
exclude the item, and the ability to assign a user to the property,
This is a visual description for the needed field:
Figure 1:

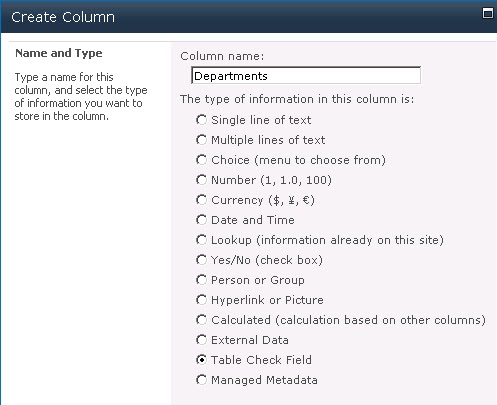
The field definition screen looks like that:
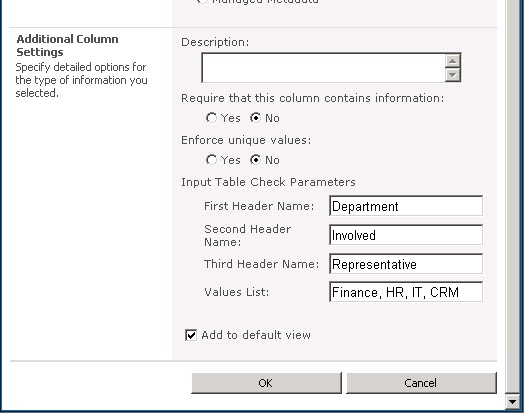
The properties definition part:
This is how I did it:
To Download the source code for this project go to:
1. I created a SharePoint Empty Project with Visual Stusdio 2010 and added the following folder structure to the project:
2. Add “System.Web” reference to the project.
3. I mapped the SharePointRoot: Right Click on the project => “Add” => “SharePoint Mapped Folder…”, and select {SharePointRoot}.
Create the folder structure:
{SharePointRoot}\Template
{SharePointRoot}\Template\ControlTemplates
{SharePointRoot}\Template\Layouts
{SharePointRoot}\Template\Layouts\Xsl
{SharePointRoot}\Template\Xml
Figure 2:

4. Add a new xml file under Temaplte\Xml folder and name it “fldtypes_TableCheckField.xml”:
fldtypes_TableCheckField.xml:
<?xml version="1.0" encoding="utf-8" ?>
<FieldTypes>
<FieldType>
<Field Name="TypeName">TableCheckField</Field>
<Field Name="ParentType">Text</Field>
<Field Name="TypeDisplayName">Table Check Field</Field>
<Field Name="TypeShortDescription">Table Check Field</Field>
<Field Name="UserCreatable">TRUE</Field>
<Field Name="Sortable">TRUE</Field>
<Field Name="Filterable">TRUE</Field>
<Field Name="FieldTypeClass">CustomFieldTypes.TableCheckField, $SharePoint.Project.AssemblyFullName$</Field>
<Field Name="FieldEditorUserControl">/_controltemplates/TableCheckFieldEditor.ascx</Field>
<Field Name="AllowBaseTypeRendering">FALSE</Field>
<Field Name="CAMLRendering">FALSE</Field>
<PropertySchema>
<Fields>
<Field Hidden="TRUE" Name="Header1Name" DisplayName="Header1Name" Type="Text"></Field>
<Field Hidden="TRUE" Name="Header2Name" DisplayName="Header2Name" Type="Text"></Field>
<Field Hidden="TRUE" Name="Header3Name" DisplayName="Header3Name" Type="Text"></Field>
<Field Hidden="TRUE" Name="ValuesList" DisplayName="ValuesList" Type="Text"></Field>
</Fields>
</PropertySchema>
</FieldType>
</FieldTypes>
I added Header1Name, Header2Name and Header3Name to be able to change the headers according to the list and ValuesList would contain the list of values to check.
The SharePoint 2007 used to have RenderPatterns in this file, they are still available to be used by setting:
<Field Name="AllowBaseTypeRendering">TRUE</Field>
<Field Name="CAMLRendering">TRUE</Field>
5. Next we need to create the FieldType Class:
Add a new class to the project and name it “TableCheckField.cs”:
I will explain the different sections we need to add and afterwards will display the entire file
I. Properties' Names:
There
are different meta properties we might want to save on the field, like
the names of the column for editing, we will create a string value for
each meta property in the following array:
private static string[] CustomPropertyNames = new string[] { "Header1Name", "Header2Name", "Header3Name", "ValuesList" };
II. Class Properties:
Each meta property should have a Class Property to expose to other classes in the solution in the form of:
public string Header1Name
{
get { return this.GetCustomProperty("Header1Name") + ""; }
set { this.SetCustomProperty("Header1Name", value); }
}
III. Set Field Rendering Control
public override BaseFieldControl FieldRenderingControl
{
get
{
BaseFieldControl fieldControl = new TableCheckFieldControl(this);
fieldControl.FieldName = InternalName;
return fieldControl;
}
}
We will create the “TableCheckFieldControl” in a later step. This property creates the control for editing the value of this field for a list item.
To
fix some inner bugs and handle the entire field spectrum of needs we
well use the following field class (the only changing content between
field types is in the regions of “Constants, Overrides, Properties”.
public class TableCheckField : SPFieldText
{
#region Constants
/// <summary>
/// This array should contain all the meta properties' names of the field
/// </summary>
private static string[] CustomPropertyNames = new string[] { "Header1Name", "Header2Name", "Header3Name", "ValuesList" };
#endregion
#region Constructors
public TableCheckField(SPFieldCollection fields, string fieldName)
: base(fields, fieldName)
{ InitProperties(); }
public TableCheckField(SPFieldCollection fields, string typeName, string displayName)
: base(fields, typeName, displayName)
{ InitProperties(); }
#endregion
#region Properties
/// <summary>
/// Each meta property should have its own Property to expose to other classes in the solution
/// </summary>
public string Header1Name
{
get { return this.GetCustomProperty("Header1Name") + ""; }
set { this.SetCustomProperty("Header1Name", value); }
}
public string Header2Name
{
get { return this.GetCustomProperty("Header2Name") + ""; }
set { this.SetCustomProperty("Header2Name", value); }
}
public string Header3Name
{
get { return this.GetCustomProperty("Header3Name") + ""; }
set { this.SetCustomProperty("Header3Name", value); }
}
public string ValuesList
{
get { return this.GetCustomProperty("ValuesList") + ""; }
set { this.SetCustomProperty("ValuesList", value); }
}
#endregion
#region Property storage and bug workarounds - do not edit
/// <summary>
/// Indicates that the field is being created rather than edited. This is necessary to
/// work around some bugs in field creation.
/// </summary>
public bool IsNew
{
get { return _IsNew; }
set { _IsNew = value; }
}
private bool _IsNew = false;
/// <summary>
/// Backing fields for custom properties. Using a dictionary to make it easier to abstract
/// details of working around SharePoint bugs.
/// </summary>
private Dictionary<string, string> CustomProperties = new Dictionary<string, string>();
/// <summary>
/// Static store to transfer custom properties between instances. This is needed to allow
/// correct saving of custom properties when a field is created - the custom property
/// implementation is not used by any out of box SharePoint features so is really buggy.
/// </summary>
private static Dictionary<string, string> CustomPropertiesForNewFields = new Dictionary<string, string>();
/// <summary>
/// Initialise backing fields from base property store
/// </summary>
private void InitProperties()
{
foreach (string propertyName in CustomPropertyNames)
{
CustomProperties[propertyName] = base.GetCustomProperty(propertyName) + "";
}
}
/// <summary>
/// Take properties from either the backing fields or the static store and
/// put them in the base property store
/// </summary>
private void SaveProperties()
{
foreach (string propertyName in CustomPropertyNames)
{
base.SetCustomProperty(propertyName, GetCustomProperty(propertyName));
}
}
/// <summary>
/// Get an identifier for the field being added/edited that will be unique even if
/// another user is editing a property of the same name.
/// </summary>
/// <param name="propertyName"></param>
/// <returns></returns>
private string GetCacheKey(string propertyName)
{
return SPContext.Current.GetHashCode() + "_" + (ParentList == null ? "SITE" : ParentList.ID.ToString()) + "_" + propertyName;
}
/// <summary>
/// Replace the buggy base implementation of SetCustomProperty
/// </summary>
/// <param name="propertyName"></param>
/// <param name="propertyValue"></param>
new public void SetCustomProperty(string propertyName, object propertyValue)
{
if (IsNew)
{
// field is being added - need to put property in cache
CustomPropertiesForNewFields[GetCacheKey(propertyName)] = propertyValue + "";
}
CustomProperties[propertyName] = propertyValue + "";
}
/// <summary>
/// Replace the buggy base implementation of GetCustomProperty
/// </summary>
/// <param name="propertyName"></param>
/// <param name="propertyValue"></param>
new public object GetCustomProperty(string propertyName)
{
if (!IsNew && CustomPropertiesForNewFields.ContainsKey(GetCacheKey(propertyName)))
{
string s = CustomPropertiesForNewFields[GetCacheKey(propertyName)];
CustomPropertiesForNewFields.Remove(GetCacheKey(propertyName));
CustomProperties[propertyName] = s;
return s;
}
else
{
return CustomProperties[propertyName];
}
}
/// <summary>
/// Called when a field is created. Without this, update is not called and custom properties
/// are not saved.
/// </summary>
/// <param name="op"></param>
public override void OnAdded(SPAddFieldOptions op)
{
base.OnAdded(op);
SetCustomProperties();
Update();
}
public override void OnUpdated()
{
base.OnUpdated();
SetCustomProperties();
}
#region Enable using custom properties in the fieldtype xml
private bool toUpdate = true;
private void SetCustomProperties()
{
if (toUpdate)
ConfigureSchemaXml();
toUpdate = !toUpdate;
}
void ConfigureSchemaXml()
{
toUpdate = !toUpdate;
XmlDocument doc = new XmlDocument();
doc.LoadXml(base.SchemaXml);
foreach (string targetName in CustomPropertyNames)
{
string target = (string)base.GetCustomProperty(targetName);
if (doc.FirstChild.Attributes[targetName] == null)
{
XmlAttribute attrib = doc.CreateAttribute(targetName);
attrib.Value = target;
doc.FirstChild.Attributes.Append(attrib);
}
else
{
doc.FirstChild.Attributes[targetName].Value = target;
}
}
base.SchemaXml = doc.OuterXml;
}
#endregion
#endregion
#region Overrides
/// <summary>
/// This property created the control for editing the value of this field for a list item
/// </summary>
public override BaseFieldControl FieldRenderingControl
{
get
{
BaseFieldControl fieldControl = new TableCheckFieldControl(this);
fieldControl.FieldName = InternalName;
return fieldControl;
}
}
public override object GetFieldValue(string value)
{
if (String.IsNullOrEmpty(value))
return null;
return value;
}
public override void Update()
{
SaveProperties();
base.Update();
}
/// <summary>
/// A Method for validating the field value when trying to save it
/// </summary>
/// <param name="value"></param>
/// <returns></returns>
public override string GetValidatedString(object value)
{
if ((this.Required == true) && (value == null))
{ throw new SPFieldValidationException("This is a required field."); }
return base.GetValidatedString(value);
}
#endregion
}
6.
Now we need to create the field editor, this control will enable us to
edit the metadeta properties of the field on its creation.
We should add a new User Control under the folder ControlTemplates, and name it TableCheckFieldEditor.ascx,
and add controls for editing the 4 properties we have.
The ascx file content is:
<%@ Control Language="C#" AutoEventWireup="true" Inherits="CustomFieldTypes.SharePointRoot.Template.ControlTemplates.TableCheckFieldEditor, $SharePoint.Project.AssemblyFullName$" CompilationMode="Always" %>
<%@ Register TagPrefix="wssuc" TagName="InputFormControl" src="~/_controltemplates/InputFormControl.ascx" %>
<%@ Register Tagprefix="SharePoint" Namespace="Microsoft.SharePoint.WebControls" Assembly="Microsoft.SharePoint, Version=12.0.0.0, Culture=neutral, PublicKeyToken=71e9bce111e9429c" %>
<%@ Register Tagprefix="Utilities" Namespace="Microsoft.SharePoint.Utilities" Assembly="Microsoft.SharePoint, Version=12.0.0.0, Culture=neutral, PublicKeyToken=71e9bce111e9429c" %>
<%@ Import Namespace="Microsoft.SharePoint" %>
<wssuc:InputFormControl runat="server" LabelText="Input Table Check Parameters">
<Template_Control>
<table>
<tr>
<td>First Header Name:</td>
<td><asp:TextBox ID="txtHeader1Name" runat="server">Header 1</asp:TextBox></td>
</tr>
<tr>
<td>Second Header Name:</td>
<td><asp:TextBox ID="txtHeader2Name" runat="server">Header 2</asp:TextBox></td>
</tr>
<tr>
<td>Third Header Name:</td>
<td><asp:TextBox ID="txtHeader3Name" runat="server">Header 2</asp:TextBox></td>
</tr>
<tr>
<td>Values List:</td>
<td><asp:TextBox ID="txtValues" runat="server">Value 1, Value 2, Value 3</asp:TextBox></td>
</tr>
</table>
</Template_Control>
</wssuc:InputFormControl>
The ascx.cs content is (after deleting the partial sub class of ascx.design.cs):
The class should inherit from IFieldEditor:
public class TableCheckFieldEditor : System.Web.UI.UserControl, IFieldEditor
First we need to define a property to hold the parent field type:
private TableCheckField fldParentField;
Then we need to initialize the field editor control with the values from the
public void InitializeWithField(SPField field)
{
this.fldParentField = field as TableCheckField;
if (this.Page.IsPostBack)
{
return;
}
//when modifying a field check the correct radio button
if (field != null)
{
string header1Name = fldParentField.Header1Name;
string header2Name = fldParentField.Header2Name;
string header3Name = fldParentField.Header3Name;
string valuesList = fldParentField.ValuesList;
txtHeader1Name.Text = header1Name;
txtHeader2Name.Text = header2Name;
txtHeader3Name.Text = header3Name;
txtValues.Text = valuesList;
}
}
The following is saving the form control back to the field meta properties:
public void OnSaveChange(SPField field, bool bNewField)
{
TableCheckField parentField = (TableCheckField)field;
parentField.IsNew = bNewField;
parentField.Header1Name = txtHeader1Name.Text;
parentField.Header2Name = txtHeader2Name.Text;
parentField.Header3Name = txtHeader3Name.Text;
parentField.ValuesList = txtValues.Text;
}
The entire class is:
namespace CustomFieldTypes.SharePointRoot.Template.ControlTemplates
{
public class TableCheckFieldEditor : System.Web.UI.UserControl, IFieldEditor
{
protected TextBox txtHeader1Name;
protected TextBox txtHeader2Name;
protected TextBox txtHeader3Name;
protected TextBox txtValues;
private TableCheckField fldParentField;
public void InitializeWithField(SPField field)
{
this.fldParentField = field as TableCheckField;
if (this.Page.IsPostBack)
{
return;
}
//when modifying a field check the correct radio button
if (field != null)
{
string header1Name = fldParentField.Header1Name;
string header2Name = fldParentField.Header2Name;
string header3Name = fldParentField.Header3Name;
string valuesList = fldParentField.ValuesList;
txtHeader1Name.Text = header1Name;
txtHeader2Name.Text = header2Name;
txtHeader3Name.Text = header3Name;
txtValues.Text = valuesList;
}
}
//save the value for the mask from the ascx to the field property
//this is the value the plugin will use to format the masked input
public void OnSaveChange(SPField field, bool bNewField)
{
TableCheckField parentField = (TableCheckField)field;
parentField.IsNew = bNewField;
parentField.Header1Name = txtHeader1Name.Text;
parentField.Header2Name = txtHeader2Name.Text;
parentField.Header3Name = txtHeader3Name.Text;
parentField.ValuesList = txtValues.Text;
}
// Properties
public bool DisplayAsNewSection
{
get
{
return false;
}
}
}
}
7.
After creating the editor control we need to create the field control,
this control is used for editing and displaying the field value.
Add a new user control under ControlTemplates names “TableCheckFieldControl.ascx”:
Add the following content:
<%@ Control Language="C#" %>
<%@ Assembly Name="$SharePoint.Project.AssemblyFullName$" %>
<%@ Assembly Name="Microsoft.Web.CommandUI, Version=14.0.0.0, Culture=neutral, PublicKeyToken=71e9bce111e9429c" %>
<%@ Register Tagprefix="SharePoint" Namespace="Microsoft.SharePoint.WebControls" Assembly="Microsoft.SharePoint, Version=14.0.0.0, Culture=neutral, PublicKeyToken=71e9bce111e9429c" %>
<%@ Register Tagprefix="Utilities" Namespace="Microsoft.SharePoint.Utilities" Assembly="Microsoft.SharePoint, Version=14.0.0.0, Culture=neutral, PublicKeyToken=71e9bce111e9429c" %>
<%@ Register Tagprefix="asp" Namespace="System.Web.UI" Assembly="System.Web.Extensions, Version=3.5.0.0, Culture=neutral, PublicKeyToken=31bf3856ad364e35" %>
<%@ Import Namespace="Microsoft.SharePoint" %>
<%@ Register Tagprefix="WebPartPages" Namespace="Microsoft.SharePoint.WebPartPages" Assembly="Microsoft.SharePoint, Version=14.0.0.0, Culture=neutral, PublicKeyToken=71e9bce111e9429c" %>
<SharePoint:RenderingTemplate ID="TableCheckFieldControlTemplate" runat="server">
<Template>
<asp:Table runat="server" ID="tbValues">
<asp:TableHeaderRow>
<asp:TableHeaderCell>
<asp:Label runat="server" ID="lblHeader1Name" />
</asp:TableHeaderCell>
<asp:TableHeaderCell>
<asp:Label runat="server" ID="lblHeader2Name" />
</asp:TableHeaderCell>
<asp:TableHeaderCell>
<asp:Label runat="server" ID="lblHeader3Name" />
</asp:TableHeaderCell>
</asp:TableHeaderRow>
</asp:Table>
</Template>
</SharePoint:RenderingTemplate>
A few points:
The table will be populated with user controls for editing each of the values in the values list.
When SharePoint loads the class “TableCheckFieldControlTemplate” the class tells it which RenderingTemplate to load. Then it goes through all rendering templates and looks for “TableCheckFieldControlTemplate”. Therefore, when the Field Control is loaded there is no connection between the user controls on the ascx and the ones on in the class, so we need to create that connection ourselves, in the following step.
Editing “TableCheckFieldControl.cs”:
change the inheritance to:
public partial class TableCheckFieldControl : BaseFieldControl
Override DefaultTemplateName:
protected override string DefaultTemplateName
{
get
{
if (this.ControlMode == SPControlMode.Display)
{
return this.DisplayTemplateName;
}
else
{
return "TableCheckFieldControlTemplate";
}
}
}
This will tell sharepoint what template to ceate when loading this control.
To create the association between the field control controls and the temaplte controls we can put the following code in the CreateChildControls override:
this.tbValues = (Table)TemplateContainer.FindControl("tbValues");
this.lblHeader1Name = (Label)TemplateContainer.FindControl("lblHeader1Name");
this.lblHeader2Name = (Label)TemplateContainer.FindControl("lblHeader2Name");
this.lblHeader3Name = (Label)TemplateContainer.FindControl("lblHeader3Name");
We use the Value override to set and get the value from the field:
public override object Value
{
get
{
return GetFieldControlValue();
}
set { }
}
and UpdateFieldValueInItem to receive the value before its update:
public override void UpdateFieldValueInItem()
{
this.EnsureChildControls();
try
{
this.Value = GetFieldControlValue();
this.ItemFieldValue = GetFieldControlValue();
}
catch (Exception ex)
{
this.IsValid = false;
this.ErrorMessage = "* " + ex.Message;
}
}
The entire “TableCheckFieldControl.cs” class is:
namespace CustomFieldTypes.SharePointRoot.Template.ControlTemplates
{
public partial class TableCheckFieldControl : BaseFieldControl
{
#region Properties
private TableCheckField ParentField;
private Table tbValues;
private Label lblHeader1Name;
private Label lblHeader2Name;
private Label lblHeader3Name;
private Dictionary<string, ControlSet> tableControlsList = new Dictionary<string,ControlSet>();
#endregion
#region Constructors
public TableCheckFieldControl(TableCheckField parentField)
{ this.ParentField = parentField; }
#endregion
protected override string DefaultTemplateName
{
get
{
if (this.ControlMode == SPControlMode.Display)
{
return this.DisplayTemplateName;
}
else
{
return "TableCheckFieldControlTemplate";
}
}
}
/// <summary>
/// This override can be replaced to return a defferent temaplte name which can
/// also reside in the ascx file under
/// <SharePoint:RenderingTemplate ID="TableCheckFieldControlTemplateForDisplay" runat="server">
/// for my purpose I will use the same template
/// </summary>
public override string DisplayTemplateName
{
get
{
return "TableCheckFieldControlTemplate";
}
set
{
base.DisplayTemplateName = value;
}
}
protected override void CreateChildControls()
{
if (this.Field != null)
{
// Make sure inherited child controls are completely rendered.
base.CreateChildControls();
// Associate child controls in the .ascx file with the
// fields allocated by this control.
this.tbValues = (Table)TemplateContainer.FindControl("tbValues");
this.lblHeader1Name = (Label)TemplateContainer.FindControl("lblHeader1Name");
this.lblHeader2Name = (Label)TemplateContainer.FindControl("lblHeader2Name");
this.lblHeader3Name = (Label)TemplateContainer.FindControl("lblHeader3Name");
bool editMode = (this.ControlMode == SPControlMode.Edit);
bool newMode = (this.ControlMode == SPControlMode.New);
if (!Page.IsPostBack)
{
lblHeader1Name.Text = this.ParentField.Header1Name;
lblHeader2Name.Text = this.ParentField.Header2Name;
lblHeader3Name.Text = this.ParentField.Header3Name;
}
// Assign current value from database to the label control
// Value 1|true|login|User Name; Value 2|true|login|User Name;
var listValues = this.ParentField.ValuesList.Split(new char[] { ',' }, StringSplitOptions.RemoveEmptyEntries);
var selectedValues = TableCheckFieldValue.FromFieldValue(string.Empty + this.ItemFieldValue);
int idIndex = 1;
foreach (var listValue in listValues)
{
var formattedValue = listValue.Trim();
var selectedValue = selectedValues.FirstOrDefault(val => val.Name == formattedValue) ?? new TableCheckFieldValue();
TableRow valueRow = new TableRow();
tbValues.Rows.Add(valueRow);
TableCell titleCell = new TableCell();
valueRow.Cells.Add(titleCell);
titleCell.Text = formattedValue;
TableCell checkCell = new TableCell();
valueRow.Cells.Add(checkCell);
// Creating a checkbox to check the default option
CheckBox chkSelected = new CheckBox();
chkSelected.ID = "chkSelected" + idIndex.ToString();
chkSelected.Attributes["DisplayName"] = formattedValue;
chkSelected.Enabled = editMode || newMode;
checkCell.Controls.Add(chkSelected);
chkSelected.Checked = selectedValue.Checked;
TableCell representativeCell = new TableCell();
valueRow.Cells.Add(representativeCell);
// Creating the people editor and populating with the selected field
PeopleEditor peSelectedRepresentative = new PeopleEditor();
peSelectedRepresentative.ID = "peSelectedRepresentative" + idIndex.ToString();
peSelectedRepresentative.SelectionSet = "User";
peSelectedRepresentative.MultiSelect = false;
peSelectedRepresentative.Width = new Unit("250px");
peSelectedRepresentative.Attributes["DisplayName"] = formattedValue;
peSelectedRepresentative.Enabled = editMode || newMode;
representativeCell.Controls.Add(peSelectedRepresentative);
peSelectedRepresentative.CommaSeparatedAccounts = selectedValue.Login;
peSelectedRepresentative.Validate();
// Adding to control searchable collection
tableControlsList.Add(formattedValue, new ControlSet
{
CheckBox = chkSelected,
PeopleEditor = peSelectedRepresentative
});
idIndex++;
}
}// end if there is a non-null underlying ISBNField
// Do nothing if the ISBNField is null.
}
private string GetFieldControlValue()
{
var allValues = new List<TableCheckFieldValue>();
foreach (var valueName in tableControlsList.Keys)
{
if (tableControlsList[valueName].CheckBox.Checked ||
!string.IsNullOrEmpty(tableControlsList[valueName].PeopleEditor.CommaSeparatedAccounts))
{
var entity = FirstOrDefault(tableControlsList[valueName].PeopleEditor);
allValues.Add(new TableCheckFieldValue
{
Name = valueName,
Checked = tableControlsList[valueName].CheckBox.Checked,
Login = entity.Key,
UserName = entity.EntityData["DisplayName"].ToString()
});
}
}
return TableCheckFieldValue.ToFieldValue(allValues);
}
private PickerEntity FirstOrDefault(PeopleEditor peopleEditor)
{
peopleEditor.Validate();
if (peopleEditor.Entities.Count == 0)
{
var newPickerEntity = new PickerEntity();
newPickerEntity.Key = string.Empty;
newPickerEntity.EntityData = new Hashtable();
newPickerEntity.EntityData["DisplayName"] = string.Empty;
return newPickerEntity;
}
var entity = (PickerEntity)peopleEditor.Entities[0];
if (entity.EntityData["DisplayName"] == null)
{
try
{
int userID = int.Parse(entity.EntityData["SPUserID"].ToString());
var user = SPContext.Current.Web.Users.GetByID(userID);
entity.EntityData["DisplayName"] = user.Name;
}
catch
{
entity.EntityData["DisplayName"] = entity.Key;
}
}
return entity;
}
//get/set value for custom field
public override object Value
{
get
{
return GetFieldControlValue();
}
set { }
}
//Update field value with user input & check field validation
public override void UpdateFieldValueInItem()
{
this.EnsureChildControls();
try
{
this.Value = GetFieldControlValue();
this.ItemFieldValue = GetFieldControlValue();
}
catch (Exception ex)
{
this.IsValid = false;
this.ErrorMessage = "* " + ex.Message;
}
}
protected override void OnPreRender(EventArgs e)
{
base.OnPreRender(e);
if (this.ControlMode == SPControlMode.Edit ||
this.ControlMode == SPControlMode.New)
{ /* Code to run in input mode */ }
}
}
}
Basically this code
dynamically created CheckBoxes and PeropleEditor controls for each value
in the values list, and then returns the values to the user.
8. Last, is the field xsl, create a new xsl file under Layouts\Xsl, named “fldtypes_TableCheckField.xsl”:
<xsl:stylesheet xmlns:x="http://www.w3.org/2001/XMLSchema"
xmlns:d="http://schemas.microsoft.com/sharepoint/dsp"
version="1.0"
exclude-result-prefixes="xsl msxsl ddwrt"
xmlns:ddwrt="http://schemas.microsoft.com/WebParts/v2/DataView/runtime"
xmlns:asp="http://schemas.microsoft.com/ASPNET/20"
xmlns:__designer="http://schemas.microsoft.com/WebParts/v2/DataView/designer"
xmlns:xsl="http://www.w3.org/1999/XSL/Transform"
xmlns:msxsl="urn:schemas-microsoft-com:xslt"
xmlns:SharePoint="Microsoft.SharePoint.WebControls"
xmlns:ddwrt2="urn:frontpage:internal">
<xsl:template match="FieldRef[@FieldType='TableCheckField']" mode="header" ddwrt:dvt_mode="header">
<th class="ms-vh2" nowrap="nowrap" scope="col" onmouseover="OnChildColumn(this)">
<script type="text/javascript">
function GetUserName(fieldValue)
{
try
{
var fieldValues = fieldValue.split(',');
var screenValue = "";
for (var valIndex in fieldValues)
{
var trimmedValue = fieldValues[valIndex].replace(/^\s+|\s+$/g,"");
if (trimmedValue != "" &&
typeof(trimmedValue.split('|')[3]) != "undefined")
screenValue += (fieldValues[valIndex].split('|')[3].replace("~","\\")) + ", ";
}
if (screenValue.length > 0)
screenValue = screenValue.substring(0, screenValue.length - 2);
document.write(screenValue);
}
catch (e)
{
document.write("None");
}
}
</script>
<xsl:call-template name="dvt_headerfield">
<xsl:with-param name="fieldname">
<xsl:value-of select="@Name" />
</xsl:with-param>
<xsl:with-param name="fieldtitle">
<xsl:value-of select="@DisplayName" />
</xsl:with-param>
<xsl:with-param name="displayname">
<xsl:value-of select="@DisplayName" />
</xsl:with-param>
<xsl:with-param name="fieldtype">
<xsl:value-of select="@FieldType" />
</xsl:with-param>
</xsl:call-template>
</th>
</xsl:template>
<xsl:template match="FieldRef[@FieldType='TableCheckField']" mode="Text_body">
<xsl:param name="thisNode" select="." />
<xsl:param name="fieldValue" select="$thisNode/@*[name()=current()/@Name]"/>
<script type="text/javascript">
for (var fieldValue in "<xsl:value-of select="$fieldValue"/>".split(',')) document.write(fieldValue.split('|')[3]);
</script>
</xsl:template>
</xsl:stylesheet>
Notice the “TableCheckField” value in both templates.
Conclution:
This is a concluion for the file types and their use:
fldtypes_TableCheckField.xml:
define the base properties of the custom field type.
fldtypes_TableCheckField.xsl:
define the way the field value is rendered to the user in views and view item forms.
TableCheckField.cs:
The class for managing the field from creation to usage.
TableCheckFieldEditor.ascx:
edit the field's meta properties when creating and editing a field instance.
TableCheckFieldControl.ascx:
Control for editing the field value.
For conclution a few resources i used when creating this tutorial:
Resources:


